How to Repurpose an Oil Lamp into a Vase (Simple DIY Decor Idea)

If you love incorporating vintage finds into your home, then you’re going to adore this charming DIY idea! In this post, I’m sharing how to repurpose an oil lamp into a vase, a perfect way to blend antique character with fresh florals.
Whether you’re a dedicated thrifter or love a touch of old-fashioned charm, this easy transformation will add warmth and personality to your decor.
I have a slight obsession with oil lamps, especially antique ones. On a recent thrifting trip, I stumbled upon a stunning glass oil lamp with its original burner still attached. I couldn’t believe how beautiful the shape was, and naturally, I snagged it up!
The burner was in rough shape and not functional, but I remembered seeing an idea on Pinterest about repurposing oil lamps into vases. It sparked an idea.
As an Amazon Associate, I earn from qualifying purchases, and this post contains affiliate links to products I love ♥ See my full disclaimer here!
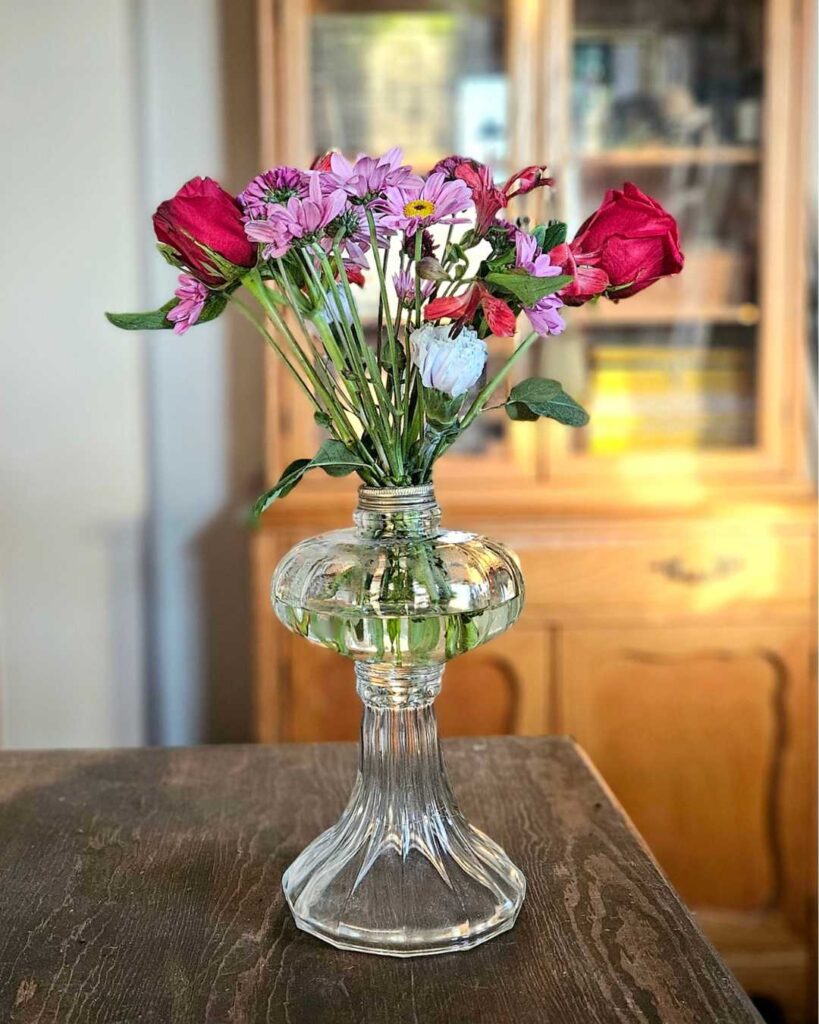
Then, as if the stars aligned, my grandson surprised me with a bouquet of fresh flowers. It was the perfect excuse to give this old oil lamp a new purpose, making it look like a charming vintage vase.
Here’s a Little Fun Fact About These Beautiful Old Pieces
Antique oil lamps were used as far back as the 1700s, but by the mid-to-late 1800s, they became common household items—especially those made of pressed or colored glass.
Many were prized not just for their light but for their craftsmanship, with some amber and cobalt versions becoming highly collectible today.
Why Repurpose an Oil Lamp?
Old oil lamps are often tucked away in antique shops or thrift store shelves, just waiting for a second life. Their unique shapes, glass bases, and sometimes ornate metal details make them ideal for turning into one-of-a-kind vases. Best of all, it’s a budget-friendly way to add character to your space with a functional and decorative piece.
How to Repurpose an Oil Lamp into a Vase
Materials Needed:
- Vintage oil lamp (glass or metal base)
- Screwdriver (optional, if disassembling)
- Warm soapy water and a soft cloth
- Goo Gone (optional, to remove sticky residue)
- Fresh or dried flowers
- Cutting Shears

Step-by-Step Instructions:
- Disassemble the Lamp: Carefully remove the burner, wick, and any metal hardware. If the lamp has a glass chimney, set it aside—you might reuse it in another project!
- Clean the Base Thoroughly: Wash the lamp base with warm, soapy water to remove dust and residue. If there’s leftover oil or grime, use rubbing alcohol or Goo Gone. Let it dry completely.
- Style with Flowers: Fill the base with water if you’re using fresh flowers or add your favorite dried blooms for a no-maintenance option. You can even display seasonal clippings like eucalyptus or faux stems for a touch of greenery.

Shop this Post
Recreate the cozy charm with these vintage-inspired finds:
Thrift Tip: Don’t overlook oil lamps with missing parts—those are often the best candidates for repurposing and usually cost less!
3 Helpful Tips for Styling Your Oil Lamp Vase
Layer in Groups
Use a Funnel for Water
Try Different Heights
Charming Ideas to Style Your Lamp Vase
Frequently Asked Questions
Most oil lamps are made to be leakproof. However, if your lamp base leaks or has a small hole, you can insert a glass liner or test with water first before placing it on delicate surfaces.
Once you’ve removed and cleaned out the burner and wick components, it’s best to use it solely as a vase. However, you can always save the hardware in case you’d like to restore it later.
Try soaking it in warm vinegar water overnight, then scrubbing gently with a soft brush. For tougher stains, a bit of baking soda paste may help restore clarity.
Where to Find Vintage Oil Lamps
Often, you can find them for under $10, making this a fun and affordable home decor project! Look for oil lamps at:
Love charming DIYs and vintage inspiration?
Love charming DIYs and vintage inspiration?
Subscribe to get access to my freebie library filled with printables, home decor checklists & more!
Download my free eBook: Decorating with Thrifted & Antiue Finds! It’s perfect for keeping in your bag on your next thrift trip!

More Posts You May Fancy


How to Repurpose an Oil Lamp into a Vase
Learn how to repurpose an oil lamp into a vase with this easy DIY idea—perfect for adding vintage charm to your home decor.
Materials
- Vintage oil lamp (glass or metal base)
- Warm soapy water and a soft cloth
- Goo Gone (optional, to remove sticky residue)
- Fresh or dried flowers
Tools
- Cutting Shears
- Screwdriver (optional, if disassembling)
Instructions
- Disassemble the Lamp: Carefully remove the burner, wick, and any metal hardware. If the lamp has a glass chimney, set it aside—you might reuse it in another project!
- Clean the Base Thoroughly: Wash the lamp base with warm, soapy water to remove dust and residue. If there's leftover oil or grime, use rubbing alcohol or GooGone. Let it dry completely.
- Style with Flowers: Fill the base with water if you're using fresh flowers, or add your favorite dried blooms for a no-maintenance option. You can even display seasonal clippings like eucalyptus or faux stems for a touch of greenery.
Notes
3 Helpful Tips for Styling Your Oil Lamp Vase
- Layer in Groups: Pair your oil lamp vase with other vintage finds like books,
candlesticks, or doilies to create a curated vignette. - Use a Funnel for Water: Some oil lamp openings are small—use a funnel to make filling the vase with water easier and mess-free.
- Try Different Heights: Mix oil lamps of varying sizes for a dramatic
tabletop centerpiece or to decorate a mantle with vintage flair.
Styling Ideas
- Cottagecore Charm: Use dried lavender or wildflowers for a soft, romantic look.
- Rustic Farmhouse: Add wheat stems or cotton branches for a cozy feel.
- Holiday Decor: Fill with red berries or evergreen sprigs during the holidays!
Often, you can find them for under $10, making this a fun and affordable home decor project! Look for vintage oil lamps at:
Thrift stores
Antique markets
Estate sales
Facebook Marketplace
Yard sales
Final Thoughts
Repurposing an oil lamp into a vase is such a delightful way to add vintage charm to your home. It’s a conversation starter, a tribute to the past, and a beautiful vessel for your favorite blooms.
Whether styled on a farmhouse table or nestled into a shelf, this DIY vase idea brings warmth and personality to any room.

Homemaking Made Easy: 5 Days to a Cozy & Organized Home
This FREE course is for anyone who wants to create a warm, welcoming space, without the overwhelm. Whether you’re just starting out or need a reset, this 5-day journey will walk you through simple steps to make your home feel more peaceful, functional, and you.
It includes:
- Daily Email Lessons
- Printable Freebies
- Easy-to-Follow Tasks
By the end of the 5 days, you’ll feel more at peace, in control, and inspired in your home.
What a creative idea, looks absolutely beautiful!
Thank you so much! 🙂